How to Measure, Size and Fit Saxophone Pads Correctly

Selecting the correct saxophone pad requires more than matching a pad to a manufacturer’s sizing chart. Both the condition of the key cup and the actual dimensions of the pad must be considered to achieve a secure, reliable fit.
Measuring each key cup and dry fitting each pad will help you select the best pad size for the specific saxophone on your bench.
What Does a Properly Fitted Saxophone Pad Look Like?
A new saxophone pad should fit snugly inside a clean, round and level key cup. When dry fitted, the following should be true:
- The pad fits snugly inside the key cup.
- The pad slides into the cup with slight friction.
- The leather does not wrinkle or distort.
- The cardboard backing does not bend.
- The pad completely fills the cup without visible gaps.
- The pad remains in place when the key cup is turned upside down.
A complete fit around the edge can also help prevent adhesive from leaking around the pad and reduce the risk of future sealing problems.
The Four-Step Saxophone Pad Fitting Process
To achieve the proper fit, follow these four steps:
- Prepare the key cup by cleaning it and checking its shape.
- Measure the inside diameter of the key cup.
- Dry fit the selected pad.
- Repeat the process for the remaining keys.
Step 1: Prepare the Key Cup
Before measuring or fitting a new pad, confirm that the key cup is clean, round and level.
It is difficult to fit a round pad correctly inside a key cup that contains old adhesive, is out of round or has an uneven rim.
Remove the Old Pad and Adhesive
Begin by removing the existing pad. Thoroughly clean the inside of the key cup, removing all remaining adhesive and debris.
Once the cup is clean, inspect its shape and condition.
Check Whether the Key Cup Is Level
The L20 Bench Anvil can be used as an inspection tool. Place the key cup rim flat against the bench anvil and check whether it wobbles or has visible gaps between the rim and the anvil.
If the key cup needs to be leveled, use an F11 Canvas Mallet or F5 Rawhide Mallet to gently tap down the high areas. Position the affected section slightly beyond the edge of the bench anvil, as shown in the accompanying image.
Work carefully to avoid denting or otherwise damaging the key cup.
Correct an Out-of-Round Key Cup
If the rim is damaged or out of round, use F61G Parallel Action Pliers with smooth, half-round jaws to carefully restore the shape of the key cup.
Confirm that the cup is clean, level and round before moving on to the measuring process.
Step 2: Measure the Key Cup
Once the key cup is properly prepared, measure its internal diameter to determine which pad size to dry fit.
Because Ferree’s saxophone pads are available in 0.5 mm increments, measuring in millimeters provides the information needed to select an appropriate starting size.
Why Individual Key Cups Should Be Measured
Manufacturer pad and key cup specifications are based on engineering measurements. Slight variations can still occur between instruments, even within the same model or manufacturing run.
For this reason, a predetermined pad set may not always provide the best possible fit for every key cup on the instrument.
Measuring and dry fitting each key cup allows you to select sizes based on the specific saxophone in front of you. When ordering pads for a special project, this process will generally provide a better-fitting set than relying entirely on a manufacturer’s standard specifications.
How to Measure the Key Cup
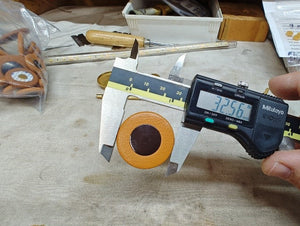
Set your digital caliper to millimeters. Use the upper portion of the caliper jaws to measure the inside diameter of the key cup within the rim.
Take measurements in two directions:
- From 12 o’clock to 6 o’clock
- From 3 o’clock to 9 o’clock
Measuring in both directions helps identify whether the key cup is consistently round.
In the example shown, the key cup measures 32.12 mm in both directions. Measurements will not always be identical, but they provide a reliable starting point for selecting a pad to dry fit.
Select a Starting Pad Size
Rounding the key cup measurement up to the next available 0.5 mm pad size will frequently provide the best starting point.
For example:
- Measured key cup diameter: 32.12 mm
- Starting pad size: 32.5 mm
This recommendation assumes that the pads are running true to size. Leather is a natural material and may vary slightly in thickness, which can affect the finished diameter of a pad. Dry fitting is still necessary before installation.
Step 3: Dry Fit the Saxophone Pad
Place the selected pad inside the prepared key cup without adhesive.
The pad should fit with slight friction and completely fill the cup without wrinkling, bending or becoming distorted. When the key cup is turned upside down, the dry-fitted pad should remain in place.
In the example above, the key cup measured 32.12 mm. A 32.5 mm pad provided the ideal dry fit and would be expected to install and perform properly.
If the pad is loose, leaves gaps or falls out when the cup is inverted, try the next appropriate size. If the pad wrinkles, bends or becomes distorted, it is too large.
Why a Snug Fit Matters
A properly fitted pad provides room for the material and key cup to respond to normal conditions without compromising the seal.
The key cup is made from a metal alloy, and metal expands slightly when heated during the adhesive and installation process. A properly selected pad helps maintain a secure fit as the cup is heated.
Leather can also shrink naturally over time in the conditions where a saxophone is played and stored. Beginning with a snug fit can help support the longevity of the installed pad.
A snug fit should never cause the leather or backing to distort.
Step 4: Repeat the Process for Every Key
Once you have established the process, repeat it for every key on the saxophone.
For a more efficient workflow, complete each stage for all keys before moving on to the next stage:
- Remove the old pads and adhesive from every key cup.
- Inspect and correct the level and roundness of every cup.
- Measure and document each key cup.
- Dry fit and document the selected pad sizes.
- Order the required pads or prepare your stocked pads for installation.
If you are ordering a pad set, use your documented measurements and dry-fit results to create the order. If you already have the necessary sizes in stock, you can proceed with installing the pads using the appropriate adhesive.
Keeping Saxophone Pads in Stock
Maintaining a selection of pads in as many 0.5 mm increments as your budget allows can make both repairs and pad sizing more efficient.
The B525MC 500 Pad Assortment with Cabinet is a practical stock option and includes a pad thickness appropriate for most modern saxophones.
Having multiple sizes available allows you to:
- Complete smaller repairs without waiting for a pad order.
- Dry fit pads before ordering specialty options.
- Determine the correct sizes for complete repad projects.
- Reduce your reliance on predetermined pad sets.
Specialty pad sets can then be reserved for specific projects that require styles or sizes you do not regularly stock.
Achieve a Better Saxophone Pad Fit
A properly fitted saxophone pad begins with a clean, level and round key cup. Careful measurement provides a starting size, but dry fitting confirms whether the selected pad is truly appropriate for the instrument.
Following this process for every key will help you achieve a clean, secure fit and prepare the saxophone for a more reliable pad installation.
- Tami Ferree
Comments 0